Tuesday, February 21, 2017

I Need To Buy Some Stock In Red Solo Cups


Well, I’m still an idiot. That old “out of sight, out of mind” is me.

I use plastic cups for seed starting. I usually use Solo, but last year, they were out of Solo. I got Hefty instead. For me, I consider that a big mistake. The Hefty is thinner and more flimsy. The lip is not as strong. The Solo is thicker and more firm. When I pick up a cup with a seedling, the Solo doesn’t collapse. The Hefty collapsed several times, spilling potting soil and seedling. A few choice words, pick everything up, tell myself to never get Hefty again, and go on with my work. 


Last year, I collected my cups and put them on the shelf in the workshop to clean for use this year. Guess what I forgot about. So this spring, I have had to do what I was going to do last fall.

I use the largest cups I can get: usually either 18 ounce or 20 ounce. I use a drill bit, a screwdriver, a knife, or whatever, to put one to three holes in the bottom. The purpose is to get good drainage. This is no beauty contest. It doesn’t have to look great. It just has to work for your new seedlings. Burrs, flaps, whatever, is fine. Just as long as it drains is all that matters. If you tear up a couple of cups before you get the knack, it is no big deal. You’ll get a technique. You’ll make it work.

Once I have holes in the bottom of the cups, I move over to the 15 gallon muck tubs I have. I usually use two muck tubs, for convenience. I fill both muck tubs with potting soil. I now take the cups with holes in the bottom over to the tubs and fill them with potting soil. Note: If the potting soil is dry, I add water and mix by hand until I have a damp (but not wet) potting soil. I fill the cups with the damp potting soil, but leave about 3/8 inch to 1/2 inch space on the top (like in canning). I sit the cups aside. When I have enough cups done (or I run out of space), I stop filling cups (for now). I then take my seeds and plant the cups. Depending on the age of the seed and what it is seed of, I plant what I think is the proper amount of seeds over the top of the potting soil. It is usually at least 2 seeds and may be 6 or 7 seeds. It is my choice and decision to meet the circumstance. It does not necessarily meet what everyone says is the “proper number of seeds per cup”. It is my cup, my seeds, my decision. Then Fiona tears off a strip of Saran Wrap to cover the top of the cup. She pulls it down firm and smooths out the wrinkles. I then put a rubber band over the Saran Wrap and down over the cup to hold the Saran Wrap taunt. This is now a mini greenhouse. I hand the cup to her and she updates the name on the cup (most are reused and already have two or three names on it). 

Solo cups with seedlings and saranwrap covers.


Note: I use two muck tubs so I don’t have to stop and refill a muck tub. When both are empty, I stop and refill both of them. If I don’t use all the soil in the two tubs, I sit them back in the workshop until the next planting session. The potting soil will dry out, but is still good. And it is sitting there ready to use. All I have to do is add water.


Note: From above, we have a bunch of mini greenhouses. We put them in flats on a grow mat. This provides bottom heat (adjustable). Then we TRY to bide our time until the seeds come up. The Saran Wrap makes a nice window to view the seedlings (hopefully they come up). The head space is to give the seedlings room to grow out of the soil. When we see a seedling coming up, we remove the rubber band and Saran Wrap. There may be even more seeds coming up. After a week or so, we cut off all the seedlings (or transplant them) except for the strongest one. 

Solo cups with seedlings hardening off.


Note: What I like about this method is the cup. When you get a plant front the nursery/big box store/whatever, it is in a small “plug” and is root bound. With the cup, I have more time (and potting soil) before the seedling gets root bound. The seedling is healthier and more ready to grow when planted out into the garden because they are not root bound. They don’t have to recover, they just keep growing. No acclimation for them from the cup to the garden.

Draw Back: This method uses up a lot of space compared to a six pack or four pak. But it results in a much better plant. Don’t let the seedlings dry out in the cups!!!

Note: Cups: You can’t have too many! We stack them on top of each other and put them in a box. I have two boxes of cups: one of new cups and one with prior usage cups. The new box has 318 cups (270 still in plastic and 48 loose). Most (if not all) are Hefty. I got all they had last year. My mistake - live and learn. The used cup box was not counted. There are 500 to 700 cups in there. These are the ones I had to wash. Job done now. Should have been done last fall. If a cup splits or gets crushed or something, throw it away. I have plenty of replacements. And the store has more of them. Solo this time! I used Terrior Seeds advice from their Gardening Almanac. I used 9 parts water to one part bleach for cleaning. I then air dry them. 

Burner with washtub of heated water


So, back to me. We have a stand alone propane burner for large Cajun pots. I have a #2 wash tub I put over it. We use this tub for dunking roosters. I bring the water up to 100 degrees F. to 105 degrees F. I put in about 50 cups loosely. I rinse and scrub as necessary. I put them in a muck tub (we have a bunch of these things). I don’t bother rinsing. My hope is that the bleach will kill any bad organism and rinse/dilute as I water the seedlings. I guess I will find out. I’m not expecting any problems. I may even do a rinse later before using them. Anyway, we finished cleaning all the used cups. We used the muck tub to carry them out to the utility trailer. I turned them upside down across the floor of the trailer to let them air dry. 

Spreading cups out to dry. 

Muck tub to carry washed cups

Helpers

 
Supervisor


We use these cups for spring cool weather crops and summer crops and again for fall cool weather crops.

For tomatoes (and anything we can’t get planted before they get root bound), We have 6” x 6” x 8” high pots we got from Greenhouse Megastore. I think they were Belden Seniors. These will hold a tomato for a long time before it gets root bound. We still start the tomatoes in the Solo cups. When the roots are starting to show on the sides fairly heavily, we transplant them to the Seniors. When weather warms up, we pop them out of the Seniors and plant the tomatoes into the garden. It gives them a nice head start. No transplant shock. Expensive on potting soil. We use the good stuff. It is worth it in the long run. Stronger and healthier transplants are the result.

I have potting soil bought last year at the end of the year on closeout. Before long, I am going to have to start filling those cups and putting seeds in them. It is a lot of work, but I am so looking forward to it. Garden dreaming!!! How’s your dreams?

May God give you your dreams.

Ralph and Fiona


PS: Fiona and I were discussing the bleaching of the cups. It is recommended that tap water sit for twenty-four hours to let the chlorine and fluoride gas off. Bleach is a chlorine product. I went and rinsed the cups to get most of the chlorine off of them. That was my mistake. I should have remembered that earlier.
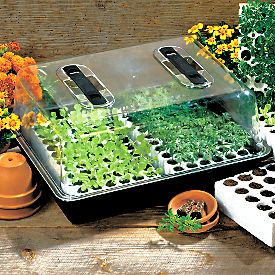
Bio-dome


PPS: I didn't mention the Bio-Domes from Park Seeds. With the cups, the Bio-Domes aren't really necessary. But I DO have them, and I like them. I do still use them. They are just an unnecessary added expense, just nice to work with. They use a plug format. The plugs are an inverted pyramid with a small short hole in the top (base?) of the pyramid. Remember, the tip (point) of the pyramid is down. These plugs drop into a Styrofoam "frame" with holes for the plugs. The styrofoam "frame" plug hole goes all the way through the styrofoam to the water.  The "frame" floats in water. Then you drop a seed or two or three into the hole in the plugs in the "frame" . The styrofoam is floating in the water with the tip of the plug in the water. Therefore, the plugs siphon water up into the plug to moisten the seeds. There is a dome that fits over the tray to hold humidity up. The dome has vent holes to release excess moisture. When the seeds germinate, I remove the dome. The water can have fertilizer added to it for the plants to use. As long as you keep water in the tray, the plugs have water. I put the trays on grow mats for bottom heat. The system I have is an older system. It has two "frames" per tray maximum. There are three sized holes (and corresponding plugs). They are small, medium, and large. I think large is called jumbo. Some such names. The "frames" are the same size. There is just varying size holes. The small holed ones have 60 plugs (120 per tray). The jumbos are 18 plugs (36 per tray). The mediums are somewhere in the middle. I can mix the "frames". I can have one small and one jumbo together in a bio-dome. The jumbos handle larger seeds like pumpkin/squash. Because the plugs are so close together, they will get crowded quickly. I can and have transplanted from the trays to cups. But I can also go from the tray to the Belden Seniors or straight to the garden. Or, to a huge twenty-four inch patio pot. Again, I plant extra seeds, then snip off the weaker seedlings in the plugs. 


Tuesday, February 14, 2017

An Equipment Overview: The First Year

Ralph here. The first year here has flown by, we are starting spring work. I thought it would be an ideal time to let you know how we have made out with the decision to get a walk-behind tractor.

Grillo 110  Walk-behind Tractor with the Berta Reversible Rotary Plow


I am lazy by nature. I don't like exercise and work. I am 67 (68 in July). I wanted a 4 wheel, riding tractor. But, as I get older, I need to be more active. I believe in "use it or lose it".

My Mother had a small fabric shop back home. A woman came in one day. Her husband came in with her. My Father was in the shop. He and my Father got to talking. They figured out that forty some years before, they used to work together. My Father asked him what he was doing now. He said he was doing nothing but watching TV. He had just retired and did nothing but watch TV. My Father told him that if that was all he was doing, he would be dead in six months. Two months later, his obituary was in the paper.

My earliest memories of Dad's Father, he was in his early 70's. He had two or three horses at all times. He had two to five cows he milked twice a day. He had three to six hogs. He had chickens. He used the horses to grow almost all the food for the animals, for himself and my Grandmother, and a lot of the food we ate. She lived to be 88 and he lived to be 93.

My Mother's Grandmother fell off the back porch and broke her hip in 17 places. She was on the way out to her garden and to feed her chickens. She lived to be 95.

My Mother's Father went into the woods every spring to hunt down "an old she coon" (raccoon). He would steal one of her cubs(pups, or whatever they are called). He would raise it all summer long. In the late fall, nature would call and it would go back into the woods and the wild life, Next spring, he would steal himm another one. At 88, he said he just couldn't do it any more. He lived to be 95.

My Mother's Mother had three gardens and an orchard. She had about ten years worth of food canned. At about 90, they were able to talk her into giving up one of her gardens. She refused to give up the other two gardens or the orchard. She lived to be 95.

My point is: The one guy sat down and died. The others remained active and lived a long, healthy life. There is no guarantee that we will live to see tomorrow. But if we don't do our part to remain active, we WILL shorten our time. We "use it or lose it".

For me, this is the background for my philosophy. To help me to overcome my lazy nature, I decided to get a two-wheeled tractor, A four-wheeled tractor would mean sitting around. Two Wheeled tractor means walking and straining to lift and turn and guide and... For health reasons, I needed to go with the two-wheeled tractor. When I say "health reasons", I mean future health. I mean the ability to walk, to do things, to be active. to have good (or better) health. To have less pain. To be able to move better. I wanted the four-wheeled tractor, but the two-wheeled tractor was a better choice for me. I may not be here tomorrow; but, if I am, I feel I will be in better health and more mobile this way.

And don't let that two-wheeled tractor description put you off. Think of a larger tiller. Yes, you have to work a little more and lift more, but it isn't that bad. Depending on the implement, some of it is almost two finger work. Some of the heavier implements is harder work. Yes, harder, but not that bad. I am 67 and I am talking of running the Grillo for three to four or five hours at a time. It isn't that bad.

 Grillo in use with the power harow

Our place is 15 acres. It is rolling. We have an east garden. It is the kitchen garden. It is about 60' by 90'. We have an herb garden to the west side of the house. It is about 30' by 65'. We have a west garden beyond that. It is for spring and fall cool weather crops. It is about 100' by 150'. It is half spring use, half fall use. Beyond that, at the bottom of the property, is a small flatter spot. It is about 75' by 100'. We may try some wheat and/or oats there. In behind the barn is the south garden. It is about 110' by 200'. It is the summer garden for hot weather crops.

Some of our farm

This sounds like a lot, but this is only for two, maybe three, years use. It is to build up our knowledge of the crops and the area. Then these same areas will still be used, just on a smaller scale and with rotational use. Instead of 75' by 150' for a spring garden, it may be 75' by 30' for a five year rotation. Or 75' by 40' for a four year rotation. Same size, just smaller with rotational use. We are new to this area and climate. We need to learn the cycles here. Also, we need to learn what crops grow best here. And we need to learn what varieties we like best. Hence, the two or three years of experimenting. Last year was a wash out, too much rain, then too dry.

That gives you an idea of our philosophy and layout. Now on to the equipment. We had decided on two-wheeled tractor, but which one. BCS and Grillo are the two main choices. BCS had a five year warranty and the Grillo had a two year warranty when we got ours. I think Grillo has upped theirs now. But, the Grillo had a 35% heavier transmission/drivetrain. Because of that, we went with the Grillo. I was looking at longevity of use. The BCS is just fine. It is just that I preferred the heavier gearbox.

Diesel or gas? I went with the diesel because the engine generally lasts longer. It also gets better fuel economy. It is 11 HP. Depending on what you are doing and the load and the RPM's, you can get 7 to 8 hours on a tank of fuel. Heavier loads at higher RPM's equals lower fuel economy. I generally fuel up when I stop for lunch. Regardless. The diesel is more expensive. Earth Tools has the prices online. If you use it a lot, the diesel will pay for itself.
Size: We had to decide BCS or Grillo. Then we could work on size. The sizes are available in each. There isn't much difference. I talked with Joel (the owner). He asked what I would be using it for. I told him. He said that the 131 I wanted was overkill. He said the 110 was basically the same, just a lighter package and a $1000 cheaper and a better fit for what we wanted. (I think Fiona said 107. The 110 replaced the 107.The 131 was more of a commercial tractor and had fewer implements - the diesel was not available for it.) We got the 110. Joel talked himself out of a $1000. He did the same on implements. He cut himself out of about $3000 on our order. So, BCS or Grillo, I recommend Earth Tools for their honesty. I wanted a heavier and bigger tractor because we would be using it a lot and for heavier tasks. I feel bigger can handle the work without working as hard. Therefore, it will last longer. The diesel was part of the package because of the fuel economy and being able to take the harder work at lower RPM's.
Now, on to implements.

Garden:
Rotary plow. More versatile, but slower. Basically, for turning the soil. Rocks up to fist size, no problem. Beyond that, no experience. Bottom plow was a concern. I was afraid the tractor would not have enough traction to pull the plow through the clay soils. Also, you would still need to work the turned soil. Not so with the rotary plow. You can plant directly into the turned soil. It does a good job of covering the weeds and leaving you with a loose surface for planting. It can be used for making raised beds or rows (for us: sweet potato rows to plant sweet potato slips into). The rotary plow only does a ten to twelve inch width cut. But then you're done. No tiller or anything really needed. It goes down to about ten or twelve inches. It mixes everything together and spreads it over previous passes. Hence, it raises the center of the field a little. This leaves a small trench around the sides. Next year, go the other way and fill it back in.

Berta Rotary Plow


Berta Reversible Rotary Plow [we have this one]

Tiller: For row and bed workup. The tractor has about a 26" to 28" tread path width. The tiller we got is 30". It covers the tread marks. Drawback: Rows need to be further apart to get between growing crops. We had to make the rows about four to five foot apart. That gave us 2.5 feet plus for the tiller and a foot on each side for tomato, corn, potato, etc. plant roots and vine growth. This is not problem for us. We have the room. Others may not have that luxury.

 Grillo Tiller

Power harrow: This is 90 degrees out from a tiller. A tiller goes top over bottom over top, etc. A power harrow goes around. Front to right to back to left to front, etc.  It is like putting your finger down in the soil and making circles. Around and around in circles. It doesn't turn the soil, it stirs the soil. It doesn't disrupt the soil structure. Drawback: It doesn't bury weeds well like a tiller does. It is used to break the soil surface and disrupt the weed roots during the growing season. It can go down about five inches, but it is used between the rows to only break up the top inch or two. Not very deep. You don't hurt your crop roots as badly, it stunts/kills your weeds, and and it loosens up your soil surface to reduce runoff without disturbing the soil. It has an expanded metal roller in back. Advantage: Broadcast your seeds. Set the power harrow tines to a half inch to an inch. Run down the row or across the field. It will stir the top of the soil and mix in the seeds. The roller will firm (not pack) the soil. I did this with cover crop last fall. Yes, I lost some seed due to too deep soil coverage (or no coverage), but I still had good germination results. I am happy with the results. In preparation for the coming garden, I wanted to break up the garden soil to help it dry out and to kill the cover crop. I used the power harrow. I was pleasantly surprised at how well it worked. I could have planted into it right then. I did the east garden and herb garden. Cover crop seems to have been killed and the soils seems to be drying better and has less compaction from winter rains. I was skeptical of the power harrow's usefulness. I have been quite pleasantly surprised. NOTE: This item is heavy, about 200 pounds. I bought 50 pounds of counterweights for the front of the Grillo to counter it. Along with the engine, the counterweights help a lot. But, it is still heavy. I am guessing 40 to 50 pounds of lift on the handlebars. It isn't bad. It is workable. But, it is still a workout. Longer rows reduce the need to lift. In the row, it is a breeze. There is hardly any work. The work is on the turns. Again, 30" width to cover the tread marks. But, OH! am I glad I have it! It is really a great help in so many unexpected ways.


Cultivator: Cheap implement. Somewhat like the power harrow. It is for breaking up the soil surface. It has no moving parts. You just drag it along behind the Grillo To break up the soil surface.

 Cultivator

Mulch layer: Basically no moving parts. Cheap. Joel has these in two, three, and four foot widths. I don't think they are interchangeable as far as the black plastic mulch. You buy mulch for your set width only. I have two foot because I don't intend to do wide rows/beds. I have the drip irrigation attachment for it so I can lay drip irrigation under the black plastic mulch. My idea is to use it for tomato, cabbage, broccoli, etc. plants and such. It covers the edge of the plastic to hold it down. It reduces moisture evaporation so the plants don't get moisture swings as badly. And it cuts weed competition near the plants.
Plastic Mulch Layer

Grass/hay/fields:
Flail mower: A neighbor mows the fields for hay, but he can't mow everything. It just isn't economical or safe. Some paddocks just aren't big enough to turn a big tractor in. The flail mower and the drum mower (later) work just fine in these areas. We had some weeds near the garden that were six feet tall with some Johnson Grass in it going seven to eight feet tall. It was fairly thick. The flail mower is fairly heavy, but well balanced. It is about a twenty pound lift. I'm not sure of that weight measurement. I just know that it didn't make much of an impression. I'm just trying to give you an idea. I did have to gear down to first gear and higher RPM's, but it pushed the weeds over and cut them off. A flail mower is a mulching type mower. It cut the weeds up fairly small. The mower has a baffle in it to hold the material in it so it cuts it up finer. The baffle is not required. I removed it. There was so much material in the mower, that it was bogging down. There was no room for the blades to turn. This did not cause a problem. Instead of one to two inch debris, I was getting two to three inch debris, maybe four inch. This from six foot weeds. It was still great for mulch debris. It broke down quickly. Even after removing the baffle, it still would bog down once in a while. I would have to stop and back up and go over it again. When I backed up, it spread it backwards a little and then I could go over it easily. It really wasn't much of a problem. If you aren't interested in quick decomposition, the drum mower will lay it down on the ground. It may then take two or three months to decompose (think windrow). The flail mower decomposes a lot quicker. This can be raked up for garden mulch.

Flail Mowing extreme weed growth
 
Drum mower: The drum mower has two counter-rotating disks with blades on them. They ride on the ground and cut at about two inch height - not adjustable. At the front, they rotate toward each other. As they cut the grass, they pull it toward the center and lay it down out the back into a windrow. The tractor runs over it (it goes under the center of the tractor). Left laying, it will rot back into the field. Thick windrow means it will take time to rot. We let it lay and dry out. Then we will rake four to six windrows into one windrow. This we will fork (by hand) into our pickup or trailer and take to the barn.It is very nice loose hay. As cut hay, it can be used to mulch in the orchard or garden or... Our poultry keep the yard "cut" down pretty well. About every three or four weeks, we take the drum mower or flail mower to the yard. They both do a great job. There isn't enough of a windrow to worry about with the drum mower. The poultry keep it down, but there is always some higher escapees. These get cut.
 Zanon Disc Mower


Molon Rake: This is five foot (60 inch). It can be used for raking or spreading (tedding). It has a height adjustment. I guess you could take it down to the bottom adjustment and spread soil with it. It actually gets down into the dirt on low settings. After using the drum mower, we use the rake to take two to four windrows from the left side and two to four windrows from the right to a center monster windrow. Actually, the left and right are just pushed into each other. Then we use the pickup or trailer to take it to the barn. If the hay is thick, we might only be able to move two rows because there is so much hay (per side, four total). The flail mower chops everything into small pieces. If you want to use this for garden mulch, run the rake drown to soil level and rake it up. You can de-thatch at the same time. The Grillo is just a pusher on this implement. The rake has two tires up front. There is a steering handle that comes back over the top. This handle is used to steer, not the Grillo. It takes about two minutes to get used to, but it isn't bad. It is the most "fun" to work with. We both like running it.

Molon Rake

Caeb baler: We do NOT have this. $10,000. It makes beautiful 50 pound round bales. Joel sells several of them yearly. Beautiful bales. So "cute". Female thing. Fiona says we don't have this YET.

 Caeb Round Baler

My office is on the east side of the house and the east garden is visible out the window. Where I broke it up with the power harrow, it looks so good and inviting. I want to get out there and plant so badly. It is still hard to believe how good of a job the power harrow does. I will use it to till/cultivate the rest of the cover crops and gardens.

The East garden, with the neighbors barn in the background.

We hope this helps you to understand our process and reasoning. Your path is determined by your needs and desires and situation. We hope this helps you in your decision process. This is not a cheap path. But it is cheaper than a four-wheel tractor. And healthier. And our best to you and to your future.

May God guide you in your process.

Ralph and Fiona

Saturday, February 11, 2017

An awesome rooster

As anyone who follows our blog knows, we have three base breeds of Chickens The Australorp, Buff Orpington  and  my personal pick, the Buckeye. We have been pleased with all three breeds and they are crossing extremely well.
Today though, I want to talk about our Buckeye rooster Red.


He is an interesting fellow. Since we butchered the last set of Roosters, keeping "The Donald" and "Henry" as replacements for "Attack" and "Jim", he has now been pushed to the bottom of the Rooster hierarchy. That is until one of the young roosters decides to get too close to the chicks.
He is the best ever Father rooster! We read that Buckeye roosters help raise the chicks and he sure has been a delight to watch over the past season chick rearing. He was the only rooster that took an active part in parenting the chicks our hens hatched.

We had a hen hatch 10 chicks just before Christmas in some of our very coldest weather. She was moved from the barn to a nest box in the trophy room, when she hatched the chicks we had moved the nest box into the Utility building. She kept the tiny fluff balls under her for at least three full days before they ventured out from under the warmth of their Mom. The turkey already had her three poult's in the utility room and two of our special chickens , Henny Penny [Gimpy Leg] and Loopy Lou[Blind in one eye] were also enjoying the palatial living. Red somehow found them and moved in. He had been hiding during the day from the Buff X Australorps who are quite aggressive, we let him stay with the group. He immediately took to the poult's, clucking to them and showing then food. Frankly they did not think too much of him. The mother turkey seemed okay with his behavior though.
As the australorp hen started to take her chicks out more Red became even happier. He would roost on a barrel with one poult beside him and overlooking hen and her mob. Soon he was scratching for them and making come for food noises. He is very polite with the hen.
Due to the door being open as often as possible we have a mouse problem in the building. Now the Buckeye do hunt more than the other breeds, now it seems more of our poultry are very good mousers. We found a mouse nest, between the shavings bags we store in the building. Red was amazing, the mice were too big for the chicks to swallow, Red spent his time ripping the mice into small pieces for the chicks. He never took any for himself and fed all three hens as well.

He still hides from the more aggressive roosters but will stand his ground when there is any danger to the hen and her now well grown chicks. He also has a tendency to get feisty with me if the chicks are nearby, I do not mind this, he is doing his job.

We are both amazed and pleased at this rooster and his behavior. We plan to order more Buckeye a bit closer to spring. We feel this parenting trait is something we want to get more of. The Buckeye hens are suited to our farm management. We are still debating if we will get straight run Buckeye or just order roosters to introduce more Buckeye roosters to breed the hens.

So as I write this "Red" is standing in the doorway of the Utility building, his chicks are gathered around him, some trying to dust bathe. He is alert and watching. Occasionally pecking at something and then letting them eat whatever it is. He is an awesome Rooster!


God Bless you and Keep you

Thursday, February 9, 2017

Guy's Can Be Stupid


Guys can be stupid, and stubborn! We WILL NOT ask directions, and we INSIST things be done our way. As an example, we have mentioned we use wood heat via a wood burning cookstove. We love it and its efficiency. And I am an example that a guy can and will put a square peg into a round hole. I am proof that it can be done.

We can add wood from the top or the front of the stove. The front is best, but not the easiest. You have to get down to the floor level and push it straight in. From the top, you just “drop” it in. Well, I like the wood “full length”! And larger in diameter. A guy thing, I guess. Well, I was putting in the wood. My piece was a little longer and a littler fatter. It was almost in. Just an inch or less to go. I pushed and shoved and hammered. It was on the charcoal/ashes of previous wood. If I just push down and forward, it will go in. I was pushing and shoving. I added a twist. It just jumped forward and in and down. With my hand in tow. My wrist landed on the hot stove top. I got burned. Not badly. Looks worse than it really is. But I got the wood in and I did it my way!!!

I finished up and went and got my Burdock salve and put it on.


It wasn’t bad painful. It wasn’t tender. And the salve seemed to take the heat out. As good as new. Or so I thought. It didn’t like being rubbed. It was tender to rubbing. The cuff of the glove hit just right. (No glove on while putting wood into the stove as I usually would have.) And the sleeve of a jacket or long sleeved shirt hit the mark just right. Hand in the pocket was not the proper thing to do. The burn was not a problem until it was rubbed. I decided it needed to be covered at certain times/situations. And we had no bandages of the large enough size left. Fiona to the rescue! And this is where all the male readers will depart for EVER.


We had no bandages large enough. Fiona to the rescue thing. You women will recognize the bandage. It is one of the woman things we guys never get close to. We know nothing about this stuff. She put some B & W Ointment on the pad. She put the pad over the burn. And then she wrapped it with Vet Wrap (maybe from 3M). I guess I am the first man to be caught wearing a woman’s pad.


Now, am I man, woman, or animal. For Fiona: all three. Works for me. The wrist: it is not tender. I can touch it. I just rubbed it vigorously (through/over the bandage) with no problem or semblance thereof. I don’t wear the bandage except when I am going to be doing something that might involve rubbing of the wrist. The wrist feels fine. There is a little infection from all of the initial rubbing. Nothing we are concerned about. If I am not getting it rubbed, there are only two areas of notice (not concern). One is when I have the bandage on. Sometimes, it will itch (as in healing). The other area is heat. No bandage – open wound. I am putting wood on the fire and the heat of the fire hits the open wound. Oh, YES! I’m not suppose to do that. It is now tender. Compare to a body burning in hell, only not as bad!

The salves/ointments came from the Amish store. The burdock salve was $22.00. The B & W Ointment was $17.00 . Both are great. Fiona uses the B & W on the poultry wounds. It works great on them as well. She has saved several hens that we thought were lost.


Well, life goes on. And that live and learn thing? Not for guys. It is still my way or the highway. We are still stupid and stubborn. I still am forcing those pieces of wood in. The problem wasn’t me, it was that twist thing I did! Besides, I am protected. I have that pretty blue bandage on. And that pad thingy. I don’t have to worry, all real men would have stopped reading way up there where I mentioned that woman thingy. They won’t have realized how well it has worked. And I am not going to put THAT in any mens magazine!

May God keep you safe from yourself and others.

Ralph and Fiona (My Doctor – par excellence)


And just for fun....a poultry video